Construction Overview
Overview of the construction process with Quad-Lock Insulated Concrete Forms (also see Insulated Concrete Forms Explained):
Click "Build ICF" to start the animation. Click "Details" after the animation to view explanations of some wall components (provided with permission from Brocon, Inc.).
Step by Step Overview
Step 1 - Footings: Pour footings level and
trowel them smooth to allow quick and easy
construction of Quad-Lock walls. When placing rebar dowels take into account
the thickness of the insulation. Refer to your applicable building code for
details.

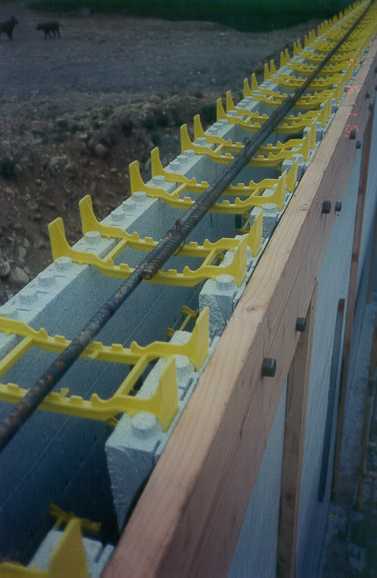
Step 2 - Metal Tracks: Metal tracks are nailed to the footing on both sides of the Quad-Lock wall.

Step 3 - Quad-Lock Assembly: Start by assembling Quad-Lock corners, angles, T-walls and other special elements first on each course and then work into and meet in the middle of each wall. Stagger panels on alternating courses.

Step 3a - Reinforcing Steel: Tie vertical and horizontal rebar into the wall assembly as required. Usually, this is done while building up the wall. Quad-Lock also allows you to build around pre-installed rebar.

Step 3b - Window and Door Bucks: Fabricate and place window and door bucks and build the Quad-Lock walls around them.

Step 3c - Top of Walls: Continue assembling Quad-Lock up to the desired wall height. Finish the top of walls using Metal Tracks and Wire Top Ties.

Step 4 - Floor Connections/Ledger Boards: Install floor connections such as Ledger Connectors or ledger boards. Several products and methods are available.
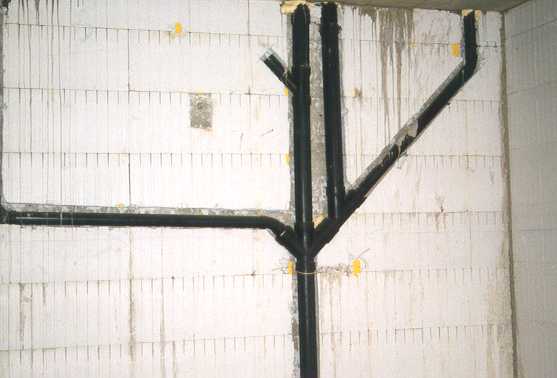
Step 5 - Through Wall Penetrations & Conduit: Install through wall penetrations (e.g. vents, block outs, utility pipes) and conduit, if needed.
Step 6 - Bracing: Properly brace all walls every 6-7' (180-210 cm) for alignment and plumb. Also brace window and door bucks and other special elements. Structural bracing is not required for straight walls, corners, and angles when the corner and angle brackets are used correctly.

Step 7 - Concrete Placement: Place concrete in multiple, continuous lifts of 2-4' (60-120 cm) and in accordance with applicable standards. Ensure proper consolidation of concrete. Check walls for plumb and alignment before, during, and after the pour. Bracing should be left in place for about 48 hours.

Step 8 - Utilities: For most electrical and plumbing cut chases into the foam and place the wires and pipes in accordance to setback requirements. Fixtures and boxes are attached to the concrete.
Step 9 - Waterproofing: Dampproofing/waterproofing is required below grade (underground). Ensure the product chosen is compatible with EPS and that it is installed according to the manufacturer's recommendations.

Step 10 - Interior and Exterior Finishes: Screw interior finishes such as gypsum boards directly to the plastic ties. Apply stucco products directly to the Quad-Lock panels according to the manufacturer's instructions. Or attach sidings of choice to the plastic ties or fastening strips as needed.

Conteúdo Relacionado:
Insulated Concrete Forms
Explained